NASA · News Releases
Copy the feed address, then paste it into Headlines.
 orbit
Orbit Android Launcher · Customer guide
Install Orbit, make the remote’s Home button yours, and build a dashboard around your apps.
Free: ad-free Home, favourites, rows and grids, global layout controls, the included/online wallpaper library, Clock and date, one Local weather tile and the Android widget compatibility test.
Pro: the planned £4.99 one-time purchase for up to five active devices in your household. It adds all 17 built-in widgets, compatible widgets from other apps, phone editing, personal photo/GIF/video backgrounds, weather-aware Atmosphere and styling for individual rows. Final pricing, taxes and terms appear at checkout when sales open.
If the TV blocks APK installation or cannot open the file, contact support with its model and Android version before buying. Do not remove a working installation to troubleshoot an update.
When Orbit publishes its official code, compatible devices can use Downloader by AFTVnews to download the installer directly.
A Downloader code supplies an installer, not a Pro licence. Keep the purchase key separate and private. There is no public Orbit code to enter during this preview.
The welcome tour introduces Orbit’s main features. Follow the on-screen controls to continue or skip; replay it later from Settings → Welcome tour.
First try the TV’s default Home setting. If your device keeps opening its built-in launcher, try Orbit’s optional Home button redirect.
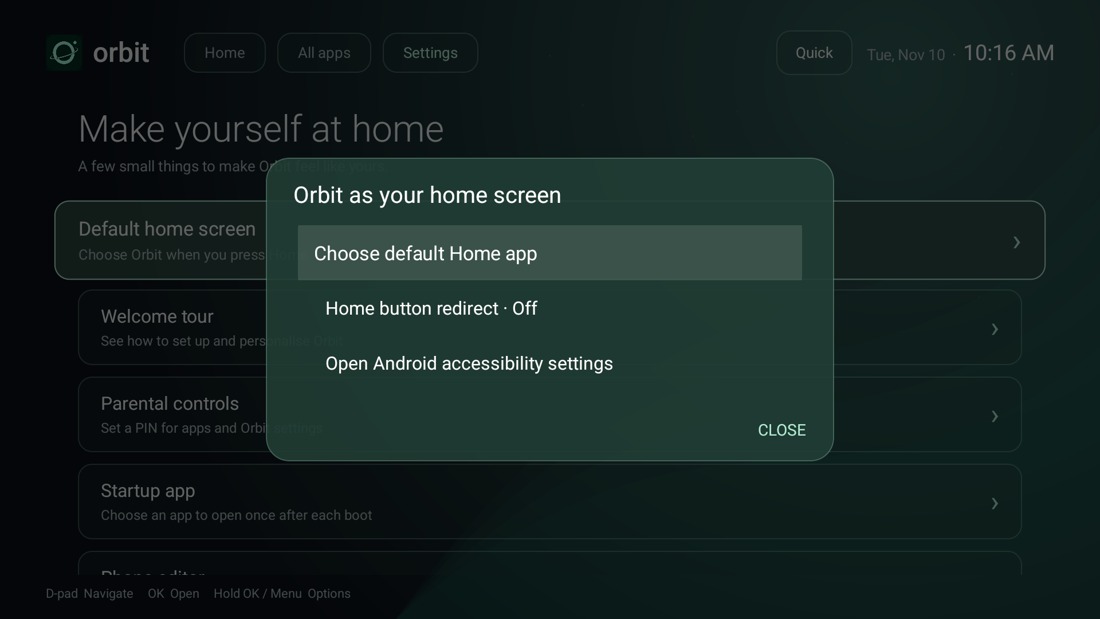
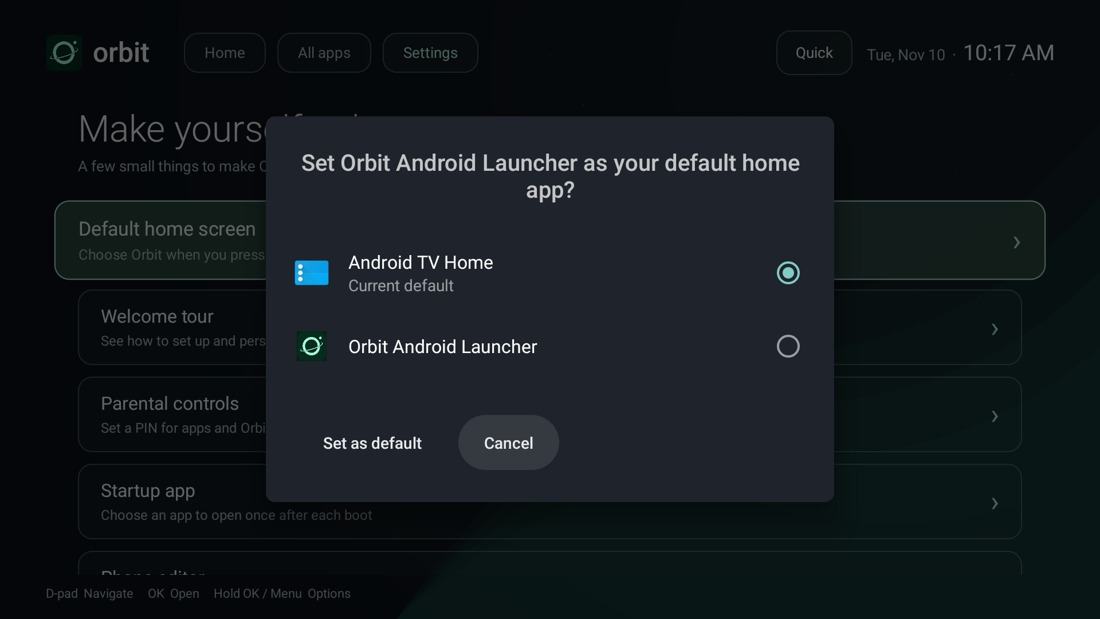
If the picker opens a general settings page, look for Apps → Default apps → Home app where available. If Orbit is absent, the picker is unavailable, or Home still opens the stock launcher, try the next method. Android’s Home app role
This optional service uses Home key events and the foreground app’s package name to redirect Home. The Orbit switch and the Android service must both be on. Only enable this service for an Orbit APK you obtained from the official download.
On our test Shield, the remote’s Home button still opened Android TV Home after Android saved Orbit as the preferred Home app. Orbit’s Home button redirect fixed that.
On other Android TV devices and Google TV devices, open Orbit from Apps or All apps. Menu names and Home behaviour vary by model and firmware. The steps above describe the available methods, not a guarantee that every manufacturer allows Home replacement.
Private release candidate. The preview is opt-in, includes selected features and takes no payment. Reset protection has been tested with a private trial service. The production trial service remains disabled until launch is approved.
To stop early, connect to the internet and choose End preview → Return to Free, then confirm. Orbit must record this with the service; if it cannot, it explains that the change was not completed. There is no automatic charge or subscription. Full Pro uses the separate installer and licence instructions below.
The service receives a hashed app-scoped device identifier and retains the original dates and ended status. It does not receive your email, payment details or raw Android ID. The identifier is pseudonymous, not anonymous. A factory reset, different Android user, signing-key change or modified/rooted system can change or spoof it; this is not a one-trial-per-person guarantee. Keep the TV’s date and time correct. Clearing data/uninstalling can still erase local layouts; only the trial record survives on the service. Portable backups do not transfer trial eligibility.
To free a device slot, open Settings → Pro licence → Release licence on the old TV. Confirm the release, then activate the same key on the replacement TV. Each purchase covers up to five active devices for you and your household. Release before uninstalling, clearing app data or resetting the device, because those actions remove the locally stored activation details. If the old TV is inaccessible, contact support using the purchase email or order reference.
Without a verified licence, the protected Pro installer offers the limited Free features. Copying an APK or restoring a layout does not transfer Pro access. A previously verified licence can work for up to seven days from its last successful check during an outage. Orbit normally checks again after a day while active. Reconnect and choose Settings → Pro licence → Check licence if access needs restoring.
The seven-day Free preview and the paid licence’s seven-day offline grace are different. The preview ends at its original deadline. Paid Pro is a one-time licence with periodic verification; temporary offline grace is not a new trial or an automatic renewal charge.
Current preview: Home, All apps and Settings have separate focus areas with extra space between them. On first installation, apps use Icons only; you can show names underneath without resetting your layout. Updates keep your existing display choices.
Open All apps to find an installed app. Hold OK on its tile for the available favourite, rename, hide or organisation actions. Hiding an app in Orbit does not uninstall it from Android.
Free includes Clock and date and one Local weather tile. Pro includes those plus the following 15 types:
| Category | Pro extras |
|---|---|
| Weather and time | Hourly outlook; World clocks. |
| Home and media | Family notes; Countdown timer; Weekly planner; Now playing; Headlines. |
| Network | Connection status; Internet speed test; Network activity. |
| Device | CPU activity; Free up memory; Memory (RAM); Device uptime; Storage. |
Set a town for weather and select one of the offered town matches. Now playing needs optional Android notification access and a compatible media app. Resource widgets use counters that Android exposes; the widget explains when it can show only Orbit’s activity. Free up memory clears Orbit’s reusable image cache and does not force-close other apps. The countdown alerts on Orbit Home and is not a background alarm.
Add separate tiles for different feeds. Automatic checks run every 30 minutes while Home is visible. Refresh is limited to once a minute per feed and respects publisher retry instructions. Cached headlines can remain visible offline with a stale-data label. Use Configure news feed or Change feed to edit it; Clear feed removes its saved address.
Feed and thumbnail servers receive your internet address. A private feed URL may contain an access token, so treat your layout backup as a private file. Orbit links to original articles; it does not scrape their pages or bundle publisher feeds.
Copy an address below into your Headlines widget on the TV or in the paired phone editor. These are optional examples tested with Orbit 0.5.25; you choose which sources to add.
Copy the feed address, then paste it into Headlines.
Copy the feed address, then paste it into Headlines.
Follow each publisher’s terms, including personal-use restrictions. Feed availability and images can change. Orbit is independent of these publishers; links do not imply endorsement. The website does not load or reproduce their stories.
Android app widgets are provided by other installed apps. Their availability, configuration and remote controls depend on the app and your device’s firmware. An app tile or a screensaver is not necessarily an Android widget.
Built-in Orbit widgets do not need a debugging grant. The compatibility test is available in Free so you can check before buying. Reinstalling Orbit, clearing its data, changing Android users or some firmware updates may require external widgets to be added or authorised again.
Use a computer you control on the same trusted home network. Keep your TV accessible to approve the connection. Network debugging allows computer control of the TV; switch it off after setup. Do not expose it to the internet.
If the TV only exposes USB debugging, do not assume network access exists. Some firmware supports it and some requires a manufacturer-specific USB connection. Ask support or your device manufacturer before changing more settings.
Download Platform Tools directly from Google, read its terms and extract the archive. Open Terminal on Mac or PowerShell on Windows in the extracted platform-tools folder. The examples below use placeholders: replace TV_ADDRESS:PORT with your TV’s connection address and USER_ID with the number returned by the current-user command. Do not type the placeholder words literally.
If Wireless debugging requires pairing, first run ./adb pair PAIRING_ADDRESS:PAIRING_PORT on Mac or .\adb.exe pair PAIRING_ADDRESS:PAIRING_PORT on Windows and enter the code when asked. Then use the connection address from the main Wireless debugging screen; its port can differ from the pairing port.
./adb connect TV_ADDRESS:PORT
./adb -s TV_ADDRESS:PORT shell getprop ro.product.model
./adb -s TV_ADDRESS:PORT shell am get-current-user
./adb -s TV_ADDRESS:PORT shell appwidget grantbind --package com.techfigure.orbit --user USER_ID
./adb disconnect TV_ADDRESS:PORT.\adb.exe connect TV_ADDRESS:PORT
.\adb.exe -s TV_ADDRESS:PORT shell getprop ro.product.model
.\adb.exe -s TV_ADDRESS:PORT shell am get-current-user
.\adb.exe -s TV_ADDRESS:PORT shell appwidget grantbind --package com.techfigure.orbit --user USER_ID
.\adb.exe disconnect TV_ADDRESS:PORTApprove the connection on the TV and check the reported model before granting permission. The grant command may print no success message; the actual sample-clock test is your confirmation. If the command is rejected, stop and send the exact error to support. Do not disable the stock launcher or change unrelated permissions.
To withdraw this grant later, reconnect only when needed and use the same command with revokebind in place of grantbind, then turn debugging off again. Android widgets may then require renewed approval. See Google’s connection instructions.
Open Settings → Wallpaper to choose an Orbit original or browse the online categories. Originals work offline. Online images show source and licence information and require internet access to load.
Pro can also use a personal photo, GIF or supported video. Open its picker from Wallpaper, select the file and preview it before applying. The paired phone editor can upload a personal photo. Animated backgrounds pause away from Home; Reduced motion uses a still preview. Supported formats and smooth playback depend on the TV.
Open Settings → Atmosphere for Evergreen, Dusk or Midnight blue. Pro’s Weather-aware option follows daylight and the forecast for your chosen town. Select Subtle weather effects for a still weather scene, or Lightweight · Colours only for the quieter option. Allow the forecast to load; a cached or unavailable forecast may not match conditions outside immediately.
The editor uses temporary local HTTP, which is not encrypted. Use a trusted network, keep pairing details private and do not set up port forwarding. If the link does not open, check guest-network isolation, a VPN or different Wi-Fi networks; open a fresh QR session if the old one expired.
.orbit file somewhere you can access outside Orbit, such as a supported USB drive.Keep backups private: they can include notes, personal images and feed addresses. They do not transfer Pro activation. On a different TV, external widget providers/permissions may need setting up again. In Free, an online library wallpaper may need internet revalidation; if unavailable, the layout still restores and Orbit explains how to reselect its wallpaper.
Development builds can use a different signing certificate and are not interchangeable with the customer installer. If Android reports an incompatibility or signature problem, contact support before removing anything.
Open it from Apps. Follow the default Home and redirect steps, check both redirect switches and test with the correct device’s remote. Recheck after reboot. Keep the stock launcher available.
Run the Free sample test, confirm that the supplying app is installed and configured, and check the provider’s own permissions. Allow it time to update. Some widgets provide only display or media controls and do not launch an app when clicked; others need a mouse. If it disappears after an app return, note the provider name, tile size and reproduction steps for support. Avoid deleting your layout while investigating.
Check the internet connection and the chosen town or HTTPS feed address. Select a town from the offered results. Wait before refreshing repeatedly; providers can rate-limit requests. A news feed is different from the publisher’s ordinary web page. Try an included wallpaper to confirm local backgrounds still work.
Check the key against the receipt. Your purchase covers five active household devices. Release an unused activation if all five slots are occupied. Release before uninstalling or clearing app data; contact support for an inaccessible device. Reconnect and use Pro licence → Check licence if it was previously activated. Contact support if the old TV is unavailable or the key is still rejected; include the order reference, not the full key.
Use the same trusted home network, keep the QR screen open and approve the pairing on the TV. Try a fresh session. Guest Wi-Fi, network isolation or a VPN can prevent local access. Phone editing is a Pro feature.
Adjust Layout and performance, reduce widget count, enable Reduced motion and try a still background. Use row margins/focus settings in Pro. If the entire display is cut off, check the TV’s display-size/overscan settings as well.
Turn Orbit’s Home redirect off, then select the original launcher in Android’s Home app setting if you changed it. See Restore your original Home screen. Export your layout before uninstalling or clearing data.
Email orbitlauncherhelp@outlook.com.
Include the device make/model, Android version, Orbit version shown at the bottom of Settings, and what happened. For purchases, include the order reference or receipt email. A screenshot of the error can help.
Leave out passwords, card details, full licence keys, pairing codes, private feed tokens and private network addresses. Purchase, refund, privacy and support policies will be finalised before sales open.